Tuesday, October 15, 2013

Homemade Char Siew

There's 2 types of char siew.  One filled with red food coloring and the other  caramelized by sugar/ or molasses.  I personally like the caramelized char siew.  It taste much better and I love the stickiness of the meat. Very tender and the fats just melt when you bite on it.

For this recipe of mine, all you need is an oven and patience to do it.  Trust me, you wont regret it. Your family will be amazed! It a real show winner ;)


Ingredients.

Part 1: 
  • Pork belly - 2-3 pieces (ask your butcher to cut around 3 inch +/- thick and remove the pork skin)
  • Black Soya Sauce - 2 tablespoon ( add more if it is not dark enough)
  • Light Soya Sauce - 1 tablespoon
  • Hoisin Sauce - 1 tablespoon
  • Oyster Sauce - 1 tablespoon
  • Ground Cinnamon - 1 teaspoon
  • 5 Spice - 1 teaspoon
  • Sesame oil - 1 tablespoon
Marinate the meat with the above ingredients for max 4-5 hours or overnight. I prefer to marinate overnight. Make sure you seal the marinate meat in a zipper bag or tupperware.

Part 2


    • Honey
    • Brown sugar
     1 hour before baking, take out the meat from the fridge and until the meat turn room temperature.  Use a glass baking tray big enough to fill all the meat in it.   Wipe some oil into the glass baking tray before adding meat to it.  Wrap the meat and tray with aluminium foil tightly and send into over and roast for 45 minutes using 200C.

    While baking, turn the meat around and cover the tray and continue roasting.  

    After 45 minutes, remove the foil from the tray.  Use a brush and brush a rich portion of honey onto the meat, both sides. Send the meat back to the oven and roast for 180C for 20 minutes (without foil).  Remove the liquid on the tray and sprinkle a portion of brown sugar on the meat. Roast for 15 minutes. Remove the liquid on the tray again, turn the meat around and sprinkle brown sugar on the meat. Make sure the meat are fully covered with sugar.

    Lastly grill the meat both sides for another 5-10 minutes to get the char onto the meat.

    After roasting, cover the meat with foil for 20 minutes.

    Slice it before serving.


    Monday, August 26, 2013

    Homemade Burger Patties

    I really hate frozen burger patties and I hate ordering from fast-food joints. They are tasteless, too much mayonnaise inside and you do not know what kind of meat inside or what they put inside!

    I love creating burgers and sandwiches. You can put anything inside and it is really fun!

    You can make thick burger patties or thin once. You can even make a nice shape out of it by getting a mould.


    Ingredient:
    • Pork Meat 500g (good to make 3 thick patties) - you can use beef or chicken meat
    • Brown Onion - 1 cut in small cubes
    • Garlic - minced
    • Garlic Powder
    • Black pepper
    • Worcester Sauce
    • Light Soya Sauce - 1 tablespoon
    • Butter
    Butter in pan and stir-fry onion till soft and add garlic. Remove from pan once you smell the garlic fragrance and set aside until cool down.

    Pork meat mixed with Garlic powder, light soya sauce, black pepper, Worcester sauce and lastly add the cooked onion and garlic. Mixed well and leave it overnight in fridge.


    Next day, add 1 egg york the k and panko breadcrumbs into the meat. Mixed it well and divide mixture into three or four patties. Form into a ball (picture below). Size will depend on how big and thick you want the meat to be.


    You can use a non-stick pan or a stainless steel pan to pan sear the meat. Use high fire to pan sear the meat just to get some browning on the meat. This way, you will seal the meet from being dry. The meat will be juicy after oven finished baking it.

    If you are using a non-stick skillet, you do not need to worry about meat sticking to the skillet and make a messed just to get the patties out.

    For Stainless skillet, make sure you have enough oil on the skillet and make sure the skillet are hot enough. Sprinkle a very small amount of salt on the skillet. Put the meat on the skillet and use a spatula and push the meat to flatten it (picture below).

    Wait for 3-5 seconds and turn the meat. Make sure the meat a nicely brown with char marks.


    Use a glass baking tray, line the fresh thymes and rosemary on the baking tray. Put the meat on the tray and put the fresh herbs on top of the meat. When you bake the meat with the herbs, the herbs will infused additional flavour into the meat. These 2 herbs are just great for Pork.

    Send into oven baking for 25-30 minutes for 170C.

    To check whether the meat are nicely done, just use a knife or fork and stick into the meat. If it is cooked, clear water will run out.


    Look at the lovely and juicy patties! (picture below). 

    Once you take it out from the oven, cover the glass tray tightly with a piece of aluminium foil for about 20-25 minutes. By doing this way, the juices will return to the meat patties and it will be very juicy.


    You can add these lovely and juicy patties into 2 piece of bread and add tomato slices, lettuces, mayonnaise or cheese. Do it the way you want it to be.


    Just be creative!


    Bell Peppers Salad

    I love bell peppers. It is very versatile. You can add to salad, eggs, meat dish etc.

    It has high nutrition values and health benefits. I've made a point to use this in whatever I cook. I just love the taste, texture and flavour!

    One of my favourite would be the Bell Pepper Salad. Good to serve whenever you invite friends or family over. It is soooo colorful that it is really a show stopper.

    I know not everyone likes the taste of the bell peppers. But if you give it a try, you will like the taste sooner or later.

    This dish is suitable for vegetarian or those carnivores out there ;)


    Ingredient :
    • Red Bell Pepper - Julienne in thin slices
    • Yellow Bell Pepper - Julienne in thin slices
    • Green Bell Pepper - Julienne in thin slices
    • Mini Red, Orange and Yellow Bell Peppers - Julienne in thin slices (optional)
    • Fresh Blueberries or Blackberries or Orange (remove flesh)
    • Feta Cheese - crumble it into the salad
    • Fresh Parsley 
    • Zest of 2 Lemon 
    • 1 Orange Zest (optional)
     Julienne the bell peppers and put it onto the big salad dish. You can add blueberries or blackberries or remove the orange flesh.

    Chop a bunch of fresh Parsley. Add lemon and orange zest. 

    Lastly, crumble some nice Feta cheese onto the salad. Chill the salad in the fridge and serve it white it is cold.

    Red Wine Vinaigrette Dressing :
    • Red Wine Vinegar
    • Honey
    • Fine Salt
    • Black Pepper
    • Juice of half of Lemon
    • Olive oil
    Use glass or steel big bowl with a sauce whisk. Add red wine vinegar, honey, salt pepper and lemon juice. Mix it all in a bowl with a whisk.

    Increase your whisk and add the olive oil in small amount so that the sauce will emulsified.

    Very important - It is really difficult to tell you the exact amount of ingredient to make a sauce. Always taste it while you are mixing until you like or satisfied with it. Trust me. You will love this.

    When you want to serve this, pour the vinaigrette in and mix the salad together.

    Love it!

    Lap Mei Fan/Waxed Meat Rice

    Lap Mei Rice is always a welcome dish during Chinese New Year (CNY).  Ive find that it is really nice having this dish not only during CNY but whenever there's friends or family visit. 

    It is really a show stopper because the rice brings so much flavour that adults and kids just love it.

    I would buy all these wax meat during CNY and keep it in the fridge for later use. You can use thai fragrant rice or glutinous rice to make this dish.

    My Mom loves this dish and she recently requested this during one of her visit. It makes me very happy to see Mom enjoyed the food that I cook.

    This is really simple to make ;)


    Stage 1
    • Dried Mushroom - 8 pieces

    Wash and soak the dried mushrooms with cold water. Squeeze the water out from the mushrooms and soak it over night.  Some people would save some water to add it to the rice. I find it very dirty so I discard all the water after soaking.

    Next day before cooking, boil some water and soak the mushrooms.

    Squeeze the mushroom dry, slice it and leave aside for later use.

    Stage 2
    • Chicken Meat - Slice 
    • Sesame Oil
    • Oyster sauce
    • Sugar
    Chicken fillet, you can use chicken breast or thigh. I prefer the thigh area because the meat are not too dry. Slice it and marinate with Oyster sauce, a little sugar, sesame oil and a little corn flour. Marinate overnight or at least 3 hours before cooking.

    Stage 3
    • Oil - 3 tablespoon
    • Wax Chinese Sausage - 2 
    • Liver Sausage - 2 
    • Wax Duck - Half, Slice it
    • Wax Pork Meat - Half, Slice it
    Use a wok, add oil and heat up the dried sausages and wax meat.  Do not overcooked it. Just heat up the wax meat until oil fragrant.  Remove the sausage skin and slice it and set aside.

    The oil from the wok, split it into 2 portions.

    Stage 3
    • Minced Garlic
    • Fresh White Mushrooms - Slice  (Optional)
    • Dried mushrooms soaked earlier
    • marinated chicken meat 
    • Light Soya Sauce 1 tablespoon
    • Dark Sauce 2 tablespoon
    • White Pepper
    Use the same wok with 1 portion of the oil saved. Add garlic and stir till fragrant. Pour into the wok the soaked mushrooms (stage 1), white mushrooms, stir for about 5 minutes and add  chicken meat marinated earlier. Add 2 tablespoon of dark sauce, white pepper and 1 tablespoon of light soya sauce.

    Cook the for about 10 minutes (3/4 cooked) and set aside.

    Stage 4
    • rice 
    • oil from frying the wax meat earlier
    Wash rice and use rice cooker to cook rice. Add oil to the rice and cook for about 10 minutes. You will noticed rice half cooked. Add the ingredient from stage 3 into the rice and stir the rice so that all mixed well.

    Put the wax meat on top of the rice and close the rice cooker lead and continue to cook. Add light soya sauce it flavour are not enough.

    • Chinese Parsley
    • Spring Onion
    • Fried Onion
    Add fresh herbs and fried onion on rice before consuming. It adds flavour and very refreshing.


    Sunday, August 25, 2013

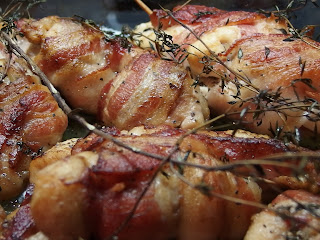
    Bacon wrapped Chicken Fillet

    My Mom and Aunt came for a visit and since my brother and hubby is around too, I have decided to make a nice simple dish for everyone.

    This is a last minute plan so I want the meat to have flavours fast and create a dish that is yummy.


    Ingredient :

    • Chicken Thigh meat - bone removed
    • Streaky Bacon
    • Sharp Toothpicks
    • Salt 
    • Black Pepper
    • Fresh Thymes
    • Fresh Rosemary
    • Olive Oil
    Direction :

    Chicken thigh - remove skin, fats and bones. Sprinkle some salt and pepper on to the meat.

    With toothpick, wrap the bacon around the chicken meat. Use a toothpick and stick it into the chicken meat so that the bacon would not fall.

    Olive oil on pan, pan sear both sides of the bacon wrapped meat for browning. Make sure the meat have slight brown char mark.

    If you are doing more than 2 pieces, split it into a few batch so that you can control the pan sear and would not overcooked it. Leave the pan aside for further use.

    Use a glass baking tray, line the fresh herbs into the glass tray. Add the pan seared meat and put another batch of fresh herbs on top. 

    Heat up the oven in advance and send the meat for baking 180C for about  20-25 minutes.

    To check whether the meat is fully cooked, use a fork or small knife, stick the fork into the meat. If it is fully cooked, clear water will flow out. 

    Picture below are the lovely meat from baking.


     For sauce for the chicken, add some heavy cream into the same pan used early, add some salt and pepper to taste. Add some garlic powder if require for taste.

     You can have these with bread or with a simple fruity salad.


    Baked Bacon with Toast

    Sunday is always a nice day to make a nice breakfast or brunch with family.

    Everyone loves bacon. You can have bacon with salad, bread, eggs etc. 

    I love to baked my bacon with brown sugar and chilli flakes to add additional kick to the meat to make it more interesting. And it taste like "bak kwa/chinese pork jerky" too.


    Ingredient :

    • Streaky Bacon 6-8 pieces
    • Brown Sugar
    • Chilli flakes
    Line the bacon on the pizza tray and cover with brown sugar. Add chilli flakes and bake it for 10-15 minutes.


    Ive bought some lovely Ciabata bread and cut into half. Add some lovely Mozzarella cheese on the bread, Ive sent the toast to the oven to melt the cheese a little.  Put the baked bacons on top and serve.

    You can add a sunny side up or hash brown to go with this dish.

    A wonderful meal to start the day :)

    Steam Egg with Pork and Park Minced Meat

    This is a recipe of my Mom's. My Mom used to make these for us and this dish just reminds me of my childhood days and it makes me misses my Mom alot.

    This is really a simple dish that adults and children likes, with lotsa flavours.

    Sometimes we just want a simple dish to eat with white rice.


    Ingredient :
    • 3 eggs
    • 1 century egg (Optional)
    • 1 Salted Egg York (Optional)
    • 500g of minced Pork
    • Medium Prawns - 7 pieces, shelf remove and minced (Optional)
    • Salt
    • White Pepper
    • Light soya sauce
    • Sesame Oil
     Direction:

    Minced meat marinate with Sesame Oil, light Soya Sauce and white pepper for at least 2 hours.

    Remove the century egg shell and cut into small pieces and set aside.

    Oil the glass plate before adding the meat so that the meat will not stick to the plate. Add the century and salted egg york on top of the meat and steam for 10 minutes. 

    3 eggs, salt and pepper and mixed it together.  Pour on top of the meat and steam for 15 minutes.

    Use a fork and stick the fork into the meat. If clear liquid flow out and meat doesn't stick to the meat, its cook!


    Saturday, July 27, 2013

    Homemade Caramel Sauce

    I love Caramel sauce!

    Caramel Sauce are filled with flavor. You can have it with ice-cream, pancakes, making candies or you can make it an ingredient for one of the dish!


    Ingredient:
    • Sugar
    • 3 table spoon of Butter
    • Heavy Cream 1 cup

    Direction :

    Use a heavy sauce pan and add sugar.  Add 1 or 2 drop of water for the sugar to melt and whisk it until the sugar melt turning amber color.

    Add butter and continue to whisk. Lastly add heavy cream to the mixture and whisk until all are perfectly mixed.


    Sunday, June 30, 2013

    Chicken Burger

    I love meat and if you see my blog, I have a lot of meat dishes.

    I hate eating McD or Burger King. They have too much mayonaise in them and just no substance.  Totally unhealthy (not that I am very healthy ;p).

    I figure that if I want to have burger or a sandwich, I might as well make my own!

    It is really easy to make your own sandwich once you figured out what ingredients do you want to put inside.  


     Part 1


    • Garlic - 2 Large one. Bake in oven 180c for 50 minutes.
    Remove the lovely soft roasted garlic from the skin and mash it. Set aside for further use.

    Part 2
    • 2 tablespoon Mayonaise
    • Lemon Zest from 1 lemon
    • Salt and Blackpepper
    Combine part 1 and 2 together to form a paste and keep it in the fridge for later use.

    Part 3

    • Chicken meat - preferable thigh area, bone removed
    • Salt and Black Pepper
    • Olive oil
    • Fresh Rosemary
    • Fresh Thymes

    Season the meat with Salt and Pepper. Heat the oil and pan sear the meat till slightly brown on both sides. Dont over cooked it because we only want a little char mark on the meat.

    Line some fresh herbs on the glass baking place, add the meat on top. Springkle a little more of the salt and pepper and bake it in oven for 170C for about 25 minutes.

    After 25 minutes, take out the chicken and cover with aluminum foil to let it rest for about 20 minutes.  We want the juices return back to the meat so the meat will be juicy.

    • Slices of Tomatoes
    • Wasabi Sprout (if available)
    • Mozzarella cheese


    Spread the bread with Garlic mayo on the slice of bread, add 2 slices of tomatoes, cheese and heat up in the over for 2-3 minutes until the cheese melt.

    Add meat, additional garlic mayo and lastly wasabi sprout + bread.

    Once you start biting on it, you will want more. They meat is so juicy. The garlic mayo + wasabi sprout adds so much flavour. 

    You will not regret it!


    Fluffy Pancakes

    I love pancakes. I really loved the chewiness inside and I like the idea of adding anything and everything inside.

    Sunday is usually my favourite day. I love to wake up and cook a nice brunch/lunch for family. Just a day with breakfast that I fancy instead of a normal boring food.


    • 2 cups of self-raising flour
    • 1/2 teaspoon cinnamon
    • 1/2 baking powder
    • 1 tablespoon icing Sugar
    • Lemon zest
    • 1/2 teaspoon salt
    • 2 tablespoon of cooking oil
    • 1 cup of Buttermilk
    • Butter

    Part A - Buttermilk

    To make Buttermilk, it's either you buy it from the supermarket or make some at home. It is really easy.  1 cup of milk and add half a lemon juice.  Let it sit for about 10 minute and that's it! (picture below)


    Part B - Dry ingredients

    Take a mixing bowl, add in flour, cinnamon, baking powder, icing sugar, lemon zest and salt into the bowl.  You may sift the flour once or twice before mixing with other ingredients. In my case, I prefer to sift twice so that the pancakes would be fluffier.  Use a whisk and mixed it all together.


    Part C - Mixing all together


    Add Buttermilk and oil inside and mix it all till it is creamy.  If the batter is thick, add some milk to dilute the batter.


    Heat up the pan and add a little butter. Using about 1/4 cup of batter for each pancake. Cook until bubbly, a little dry around the edges, and lightly browned on the bottom; turn and brown the other side


    Serve it with maple syrup, honey or berry topping.


    Tuesday, June 25, 2013

    Baked Miso Cod Fish

    My husband loves fish. He always tells me that fish is an important protein for us. While staying in KL, it is really very hard to get different types of fish and if I can get one, it will be expensive!

    Staying in Singapore, I've found a fish and seafood seller who can supplies a lot of types of fish. e.g. cod, salmon, mackerel, large prawns, squid, pomfret, red snapper etc etc.

    When I have fish, I like big fish. I really hate small one with little meat. Waste of time eating it .

    One of my favourite is Cod fish. Love it because the meat is just white color and tasty.  


    Recipe:

    • Cod Fish Fillet 1 piece - defrost and room temperature
    • Japanese Miso Paste - 1 table spoon
    • Fine Sugar
    Direction :

    Marinate cod fish with miso paste. Make sure it is evenly distributed.  Sprinkle a little sugar on both side. Miso paste tend to be salty so do not add too much paste to the fish.

    Marinate the fish for 2-3 hours.  Preferably to use small toaster oven to bake the fish. If you do not have a toaster over, just normal oven with low temperature about  130C for about 15-20 minutes.

    Check the texture of the meat whether is it firmed. If it is firmed, then it is cooked.

    Serve while it is hot.

    Good luck and happy cooking!

    Sunday, June 23, 2013

    Potato and Leek Soup

    I love this soup.  It is really a comfort food/soup after a lousy day.  It is creamy and filled with flavour.

    I fell in love with this soup back in 2008 during my trip in Bali with my girlfriends. On the last night, we found this restaurant to have dinner without reservation.  It was a peak season and it was pretty hard to find a restaurant without reservation. While waiting for some of my girlfriends to finished last minute shopping, Ive decided to order this soup to fill my tummy and for the girls to pay!! ;p


     Recipe :
    • 4-5 Russet Potatoes - Remove skin and cut into small cubes
    • Leeks - Slice the while and light green part only
    • Butter - 1/4 stick
    • Seasalt
    • Blackpepper
    • Fresh Thymes - leaves only
    • Heavy Creme
    • Water - 1 cup
    • Fresh Chives as garnish

    Direction:

    Butter in pot and add leeks.  Stir-fry the leeks till soft but not brown in medium fire.

    Add potatoes, chicken stock and water.  Boil the potatoes till soft.

    Once the potatoes soften, use a hand blender and blend the soup till smooth. If you do not have hand blender, use a normal blender by transferring the soup into the the blender.

    After blending, add fresh thymes some seasalt and pepper and boil for 20 minutes. Always taste the dish that you are cooking and  decide how much salt and pepper do you prefer.

    Do not follow a recipe blindly.
    Add creme to the soup. If the soup is too watery, mix corn flour and water and mixed into the soup bit by bit.

    Serve the soup warm and not pipping hot.

    Garnish with Chives and some additional pepper.

    Enjoy!

    Brine Roasted Chicken with Spice and Herbs


    I love roasting meat. The reason I love roasting meat so much is because I get to play with spice and herbs. You can mix and match the spice and you will be surprised with the result!

    I have not been cooking for a while and I missed my roasted chicken.  I went to the market today and bought myself a medium big fresh whole chicken. Figured that I have the time so I've decided to brine the chicken first so that the meat will be very juicy after roasting.

    Part 1 - Brine Chicken:
    • 3 tablespoon each of sugar and salt
    • 2 dry Bay leaf
    Use a large plastic container, big enough to store the whole chicken. Dilute the sugar and salt in the container and add the whole chicken into the container. Let the chicken swim for at least 2 hours or overnight.

    Take the chicken out from the container 1.5 hours before roasting. Wipe dry the chicken with clean cotton cloth and side aside.

    Part 2 - Ingredients to prepare before roasting :


     Vegetable :
    • Pumpkin/Butternut Squarsh - Cut into cubes
    • 1 or 2 sticks of Pasnips - cut into 1cm
    • 1 or 2 sticks of Carrot - cut into 1cm
    • Celery - sice into semi long slice with 1.5cm (you can use Fennel instead of celery if you want)
    • 1 large Brown Onion - Slice it
    • Olive oil 
    • Seasalt and Blackpepper
    Use a large roasting glass plate which is big enough to store the vegetables and chicken.  Put all the vegetable in to the plate add some olive oil, salt and pepper. Mixed it together and set aside.


    Part 3:
    • Butter - half stick. melt in pot and set aside.
    • Cinnamon - 1/2 tablespoon
    • Ground Coriander Powder - 1/2 tablespoon
    • Paprika - 1 tablespoon
    • Fresh/Dry Rosemary
    • Fresh/Dry Thymes
    • Black Pepper
    • Fine Salt
    Use a brush and spread the melted butter all over the chicken.  Put a bunch of Rosemary and Thyme into the chicken cavity. Rub chicken with Cinnamon, Coriander Powder, Paprika and Blackpepper all over the chicken. Sprinkle fine salt all over the chicken (just like picture below :


    Once you have spread all the ingredient onto the chicken, combine the chicken and vege together (picture below) and add some herbs onto top of the chicken.


    Oven reheat 180C for about 15 minutes.

    Use 1 piece of aluminium foil and cover the whole chicken. Send it into the oven 200c for 40 minutes. This way, the chicken will not over burned before cooked.

    Remove the foil and continue to bake the chicken for 180C for 35 minutes. Take the chicken out from the oven and slice the thigh area to see whether there's any juice flowing. make sure the juice are clear in color. If you want to make it cook further, send the chicken back to the oven for another 20 minutes (max).

    Split the chicken from the vege and send the vege into the over for another 20 minutes.

    While waiting, use an aluminium foil and cover the chicken tight. Let the chicken rest so that the juices will return back to the meat.


    After 20 minutes, enjoy!


    Homemade Chicken Stock

     
    Working 5 days a week do not really give me the luxury to cook at home everyday. I wish my mother would visit me more often to cook for me and I am pretty choosy when it comes to the food. Having breakfast, lunch and dinner outside bores me.

    Sometimes you just want some home cook food. To get the right taste that you want. The right amount of salt. the right amount of sweetness, etc etc.

    One of the best and easy thing that I love making is homemade chicken stock.  My mother-in-law has given me a very huge pot  and this is really useful to make these stocks.  I’ve found out that the chicken stock/broth sold at the supermarket are too salty, lack of flavour and there’s just no kick to it. Once I’ve started, I never look back!


    Ingredient requires :
    • 1 medium size Chicken (with head intact) or 2 chicken carcase
    • 4-5 sticks each of Celery and Leeks (I prefer Japanese leeks)
    • 2-3 Large Brown Onion (remove skin and cut into halves)
    • 1 whole garlic (with skin and knock it)
    • 2-3 sticks of carrot
    • Fresh Thymes
    • Fresh Rosemary
    • Chinese Parsley
    • White peppercorn (a small bunch/10 pieces)
    • Seasalt
    Direction :
    Wash the chicken and remove internal waste.
    Put all the ingredients into the pot and fill up with water and boil in high fire for half hour.
    Reduce to medium fire. Add hot water if the water level reduced.
    Boil for 5-6 hours in medium fire.


    After 6 hours boiling all the ingredients are soften (picture above). Remove all the ingredient from the pot and split the stock into separate plastic containers.

    Keep the stocks in the freezer for up till 1 month.


    You can use the stock for noodle soup, risotto, stew etc.